Wednesday, December 31, 2014

Trying Something I Saw My Girl Do...

MY 50's snow girl - Roberta Laliberte inspired

I LOVE watching my girl* Roberta Laliberte do her thang. If you haven't seen her work you can check her out on YouTube or visit her blog, Prairie Fairy Designs. SUCH talent!

 * she doesn't know me, but she's my girl, my go-to girl.  She is such an inspiration!


Her work is just scrumptious! Yeah, SCRUMPTIOUS is the perfect word to describe it. It's delicious, and yummy and makes me scrunch up my shoulders and shiver! To watch her start out one place and take things in a whole different direction with a stroke of her paint brush is JUST awe inspiring! It's truly magical!  In the words of George Gwershwin, 


  'S wonderful! 'S marvelous 
'S paradise, so satisfactual
'S what I love to see 

Okay, so you get the picture, right? I want to be her when I grow up, artistically speaking, LOL!

I was watching her one video, The Queen Bee, and it really drew me in. She started her canvas with a magazine clipping and she transformed it. 


It made me remember how as a teen I would use this light thingy I had, sort of like the transparency projector teachers used in school (dating myself). With mine you would place it on top of a photo and project it onto a piece of paper taped to the wall. It wasn't a very clear image but I could get the general outline. I would work off of the outline and sketch in the drawing's details. After using this method for some time I got pretty good at portrait drawings. (Wish I still had some of my old journals. I did some really cool Elton John portraits). 


So I thought, if it worked with drawing maybe using the technique in Roberta's video would improve my painting. I have in the past done something similar where I just embellished a picture or cutout, this time I wanted to try to totally change it up.


Instead of a canvas I worked on a page in my art journal. Being in a winter mood, I began by creating a snowy background. Using a Neo-color crayon and a Gelato I gave it a nice blue base. I then used my hand carved snowflake stamp and added a few falling flakes in silver, blues and white.  


Next I added the star of the show, in this case Julianne Moore, taken from an ad in Elle magazine. 


Looking at her I decided to give her a 50's look. 
(for the record Ms. Moore wasn't born until 1960.)


Using white gesso I painted the shapes to represent her mittens and hat. I also applied clear gesso over her face.


Once that layer was dry it was time for some acrylic paint. I wish I had taken more pictures of the process but I got so 'into' it that I just kept painting. 


I added some texture and pattern to her mittens using modeling paste and a tracing wheel tool, normally used in sewing.


I found the hardest part for me was the shading of her face. I painted layer upon layer, over and over, until I was finally satisfied. This is one of the earlier views (before her mascara)...forehead was a mess!   ( I find it very helpful to take photos and review my progress. It's good to see from a different view other than staring at the actual piece.)


Painting her eyes, nose, teeth and lips wasn't hard at all, actually it was the most fun! It was like applying makeup. (In fact my daughter said she'd love that shade of lipstick herself.)


A touch of color, a bit of white paint to make them pop and then finished it off with a little sketching using Stabilo pencils (both black and white).  


I think I took a few years off of her, what do you think?


I love my finished painting and can't wait to try it again. Crossing my fingers that my painting skills improve. Until next time!

***Roberta has a really cool online class called "Magazine to Masterpiece "- You can get more info HERE.***


PS...  Before you go - please join my facebook group, Fabric of My Life. Think of it as our own art cafe, a place where we can get to know one another, share our work, ask questions, or just shoot the breeze.

Thursday, December 18, 2014

Coming in January: CREATE. SHARE. INSPIRE.

 I'm issuing a challenge to you - JOIN Me!


CREATE. 

      SHARE. 
         INSPIRE.

It's what we do - whether you call yourself an artist, crafter or artisan. 


Isn't that why we blog, post our videos to YouTube and chat on Facebook? We join online groups to find like-minded folks. In doing so we end up building our own little art community.

I belong to a couple groups (I use the term 'couple' but in fact it's quite a few!) I have found that many of my friends, like me, play in more than one creative field. We like working in many different mediums.  Some of my friends are on Facebook, others blog, and still others hangout on Youtube. I wanted to find a way to get all my friends together. That's when I came up with the idea of throwing a little on-line party - a challenge of sorts.

I am sending out this invitation to you -

Here's how it will work:
  •  Beginning on January 1st, and every Thursday in January, I will post a winter-themed prompt. (might be a photo, quote or just a color palette)
  • Based on that week's prompt, you will CREATE something in your choice of creative field or medium. You can even change up from week to week (this week mixed media, next week jewelry design..you get the idea).
  •  The following Tuesday (and every Tuesday thereafter) you will SHARE your creation by linking up on my blog (more on that later). You can link up to your photo, blog post or video. Whichever - it's totally your choice.
  • Stop by my blog, click on the other links and meet new friends. I have no doubt your work will INSPIRE others and who knows, you might even be inspired to try your hand at something new! (Oh, AND you might gain another follower or subscriber too!)
Here is how you sign up:
1. Leave a comment below.
2. Request to join my new Facebook group,  CLICK HERE.
I created this group for you! A place to bring together all my creative friends and followers. Think of it as our own art cafe, a place where we can get to know one another, share our work, ask questions, or just shoot the breeze. So join in, introduce yourself and let us know about your creative journey.
If you are not on Facebook then email me with your name and the best place to connect with you.  I don't want you to miss future updates or instructions.
So, are you up for this wintery challenge? Come along, join me and let's start the New Year off right!
  
(ps: more news to tell but can't spill the beans just yet. YOU will be the first to know. LOL)

Saturday, November 29, 2014

Mixing It Up for a Holiday Swap!

My ornaments - Photo by Jill Bradley


I belong to an online bead community called Bead Swap - USA. For the last couple years I have taken part in their annual "Christmas Ornament Swap". My partner this year was my good friend, Jill Bradley.

Jill sent me the most beautiful ornaments (and other goodies!) She had sent me a set of four ornaments so I was able to share with my three daughters. I love the idea of us having the very same ornament on each of our trees!

Goodies: Holiday towels and Tupperware


 Isn't it beauiful! 
I love the mix of the red crystal with the bright silver star!


Now it was my turn to create for Jill.

Over the past year I have moved away from my jewelry making to mixed media art. I needed to find a way to incorporate both of these into my ornaments. I went to my go-to for ideas - Pinterest!
I found a great ornament made by one of my favorite mixed media artists, Roberta Laliberte.

The design and the instructions are ALL Roberta's but I am presenting it by showing photos from my process. With that said - 


Here is the first ornament - 

First thing I did was make some of my pretty painted paper. I started with acrylic paint in a pretty palette of purples, yellow, blues, orange and lime green.

Next step is to cut out an outline of the bird from cardboard (2 per bird). Using masking tape I taped the cut-outs back to back.


Next, I stuffed the bird with crumbled paper. More masking tape, making sure to seal around the whole perimeter, closing up every opening.


I put together a small

string of beads (on wire). Added a loop on each end of the wire and then fed it through the body of the bird. I taped around the openings made by the wire. 


Next step was to coat the bird with some black gesso.


Now to dress the bird. I had cut out the painted papers and then I decoupaged them to the bird shape. Added a few more details using rubber and foam stamps, and some of my penwork.


Glued on some seam binding and a little metal doo-dad and done!


I also made up a couple extra ornaments. In my stash I had a few store-bought paper mache pieces from Michael's.


 I decoupaged on some torn pieces of my leftover deli paper. Stamped some more deli paper with the words "Merry" and "Joy" to give them festive messages.


I hope Jill loves them as much as I do hers! 

Happy Holidays everyone.

xxoOh! Shelley

Saturday, October 18, 2014

Honored and Humbled

I am  both honored and humbled to be included with the most talented of jewelry designers being featured in an article on Craftsy.com, written by my friend, Ema Kilroy!

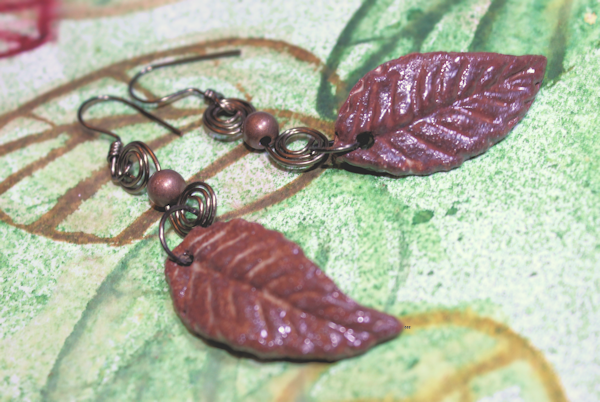
These are my earrings!


Ceramic Leaf Charms (handmade by me!) hang on brass colored wire
worked into a swirl and accented with small copper bead.  
Available in my etsy shop!

Do you like the background paper in my photo above? 
Well, it's one of my painted papers. 
You can get note cards in the same design in my etsy shop - CLICK here


Shelley Graham Turner
TORI SOPHIA Designs


Wednesday, October 1, 2014

My First JUNK JOURNAL!


Some time ago I joined a new Facebook group called Junk Journal Junkies. I decided to join after viewing a few Youtube videos. There were two artists I really enjoyed viewing. 

The first is Thrifty Lou! Louise is from the U.K. and she is a "hoot"! That is the perfect word to describe her as watching her shenanigans will have you hooting AND hollering with laughter. She has the cutest daughter, named Lottie and together they can make a simple giveaway drawing entertaining as any sitcom on the tellie! LOL. Besides being great fun to watch, Thrifty Lou is a very talented journal maker. Her projects are packed with cool items and she puts a load of love and thought into each one she creates!

Here's one of the very first video I viewed of her's...she had me after this! 


The second artist, Shannon Green, is the total opposite! LOL!  Watching her gave me so many ideas on what to include and where to find goodies, for FREE!


I went right out the next day and began to "gather". I hit up the tourist and info rack at the public library, went to a local hotel for loads of restaurant take-out menus and a few local maps. I also visited the Post Office to grab some free forms and the like. In addition I made a few swaps with other JJJ's and received some REALLY cool items. I have great package Karma (loads of happy mail comes in!!) But I got my most favorite JJ items from two special friends, Lea Avroch (LA Jewelry Designs) - she sent me huge, glossy magazines from NYC and the Hamptons area, AND Solange Collin (Ahowin) - she sent me magazines and newspapers from France! 


Well, I JUST finished creating my first junk journal (JJ). JJ's mean different things to different people. I wanted to incorporate junk mail and other cast off items in mine.  This one I made for the swap called "Use Your Stash Junk Journal"  on FB:Junk Journal Junkies.  
I am swapping internationally so I tried to incorporate items which were local to where I live and/or from the USA.  I used loads of my own painted papers too. My partner loves purple and green (my favs too!) so I threw those in wherever I could. I loved the process and wanted to keep this one but I let it go! (after arguing with myself a bit. LOL)

Here is a summary of my process:

The gatherings...


This is the color palette - she likes the green and purple combo that I love!


And here is the guts - ads, menus, local attractions and news, plus some U.S. goverment issued forms I had laying around.


Here is the front cover - I took a used US Priority flat-rate box and cut it open, lightly sprayed the inside with water, waited for it to soak in and then removed the top layer to reveal the corrugated inner layer. 

I painted on some white gesso, when it dried I used acrylic paint in aqua to stamp some shapes and applied a little purple Gelato to the edges. To the reverse side I used circle daubers in several shades of purple.


These are a few of the pages - 


Leftover W-2 forms from my old job... and a bag we used at the Alzheimer's Assoc. fundraiser we held last week (more on that soon!)


Here's transfer iron-on tissue paper which was included in a old pattern I picked up at a thrift shop.


Leftover paint I applied to a page from an old dictionary..also applied some Heidi Swapp epoxy stickers to jazz it up a bit. On the right is a security envelope I got with one bill or another.


An application for a Passport I picked up from the Post Office but didn't use.


A page from a French magazine and a mail flyer from a ministry.


Here's a glance at the outer back cover.


I tucked in several goodies (they will remain a surprise) but one other item I tucked in was this tag. I keep a couple of these blanks close to my work area at ALL times. I wipe off my excess paint and inks onto it, wet stencils too! Then I embellish it and add some cool seam binder or other fibers and textiles to give it life.  I ALWAYS love the results. I REALLY, REALLY had to force myself to part with this particular one. The photos are not doing it justice!


Want to learn more about the process I used? 


CLICK HERE to visit my Youtube channel and see many more projects, don't forget to subscribe!

Thanks for stopping by!

Friday, September 19, 2014

Chaos!

"All great changes are preceded by CHAOS." - Deepak Chopra


Ha! When I think of "chaos" I immediately think of my studio (well, to be perfectly honest, FIRST, I think of the tv show, Get Smart. LOL).  

Yes, my studio is usually a mess, but it's a creative mess. That's a good thing! When there is chaos that means I have been working and playing. It means I have been creative, and there is nothing bad about that, right?! I am learning to embrace my "chaos"....just don't pop by for a surprise visit, okay?! 

Here's what I have been working on these last couple days -


I started with a 7"x14" canvas which I primed with gesso. I recently purchased a small sampler from Faber-Castell which included gesso, gel medium and glaze. I decided to try them all out on this project, beginning with the gesso. I apply my gesso with a palette knife. I really liked this gesso, it was lighter than what I usually use and it didn't leave as chalky of a finish. I didn't need the gesso to cover anything, I just needed to add a little "tooth" to the canvas surface, so it was perfect.


The next thing I did was to grab my favorite medium, my Gelatos®,  a Faber-Castell Design Memory Craft® product. If you haven't used these you don't know what you are missing. These creamy sticks are so vibrant and they can be used wet or dry. Wetting them results in a watercolour effect. I just LOVE them!


Finally decided on a color palette and grabbed some acrylic paints to match (I buy my acrylics to match my Gelatos®).  

I applied a little Butter Cream Gelato all over the canvas*, using a baby wipe and my fingers, I rubbed it around to create a light background.  (* oops, as I was editing my video I see I also used Butterscotch Gelato in the background).


Next I used my handmade foam fern stamp, along with the LIME Gelato. I "colored" the stamp with the Gelato then spritzed it with a little water. I like the effect, later I will add a little to it with a Stamper's Big Brush Pen.

Using modeling paste (darn it, wish I had some of the Whipped Spackle, it's on my LIST!) which I have tinted with acrylic paint, I stenciled onto the canvas using Joggle's stencil called "Spin".


Next I used plain modeling paste to stencil a couple larger swirls. After they dried I "colored' them with Cotton Candy Gelato and spritzed with water to create that watercolor effect I talked about earlier. Then I added a little Blueberry, Lime and Metallic Mint to the mix to give it some more depth.  


A corn pad glued to the other side of a stamp.

I continued to use the stamps to fill up the background in several shades of greens and blues. I also used a dot dabber (from Gelato's Tool kit) and a marker top to create a few round shapes. One other circle was created using a foam pad made to treat corns! LOL!   (I am always on the lookout for items I can use to create shapes and texture and will use almost anything in my mixed media art.)  


When it was dry I coated the whole canvas with Mod Podge to seal it. 


NOW, the fun begins - shading and markings! I love this part, it's what give my pieces their dimension and movement. I use my Stamper's Big Brush Pens to do my shading. Once you have sealed the layers underneath you can add the ink (India Ink) and rub it in. Later when it dries it will be waterproof!  In addition to these I used Molotow acrylic paint pens and a Zig Posterman marker. 


Once the final layer of color has been finished it's time to add my quote. Using a technique I learned from July of "itsaworkofart "YT Channel (http://youtu.be/BF1zIweCBPI),  I printed my quote onto a papertowel. I spray my printout with cheap aerosol hairspray to keep the ink from bleeding.    


Once it's dry, I gently pulled the plys apart until I had just the top layer with the words I was using. I coated the back of these words with the gel medium and then placed it onto the canvas. I then added another layer of the gel medium on top to seal it to the canvas.


LASTLY, I used the stipple brush from the Gelato Tool kit with watered down acrylic paint to flick some paint onto the whole canvas. NOW, it's complete and I love all the texture and dimension!  What do YOU think? Leave me a comment and let me know.


I will be posting a video of the making of this canvas in the near future (I have LOTS of editing to do!!) - So stay tuned to my Youtube Channel!

UPDATE: Video uploaded so go check it out!


If you would like FREE step-by-step instructions on how I created this canvas, along with a detailed list of the supplies used, JUST let me know and I will e-mail it to you! USE the CONTACT ME! form on the left, at the top of this page.


Faber-Castell Design Memory Craft® products:
Textural Accents Sampler #770301: Gesso, Semi-Gloss Gel Medium and Semi-Gloss Glaze
Gelatos®: Butter Cream, Butterscotch, Blueberry, Lime, Metallic Mint, Cotton Candy
Stamper's Big Brush Pens: Cold Grey III #232, Leaf Green #112, Cadmium Yellow #107, Indanthrene Blue #247
Gelatos Tool Kit #770312 Palette Knife, Blending Chise, Stipple Brush, 2 Dot Dabbers and Drip Dropper

Other Supplies:


  • 7"x14" canvas
  • Acrylic Paints - Apple Barrel (Kings Gold, Cloudless and Laguna) Craft Smart (Green) and my own mix of mint green.
  • My handmade foam and carved rubber stamps
  • Modeling Paste
  • Joggles Stencil - "Spin"
  • Molotow One4All Acrylic Premium Paint 2mm Rd Tip - black and white
  • Zig Posterman Pen - gold
  • Mod Podge (Glossy)
  • Printer
  • Papertowel
  • Water


Related Posts Plugin for WordPress, Blogger...